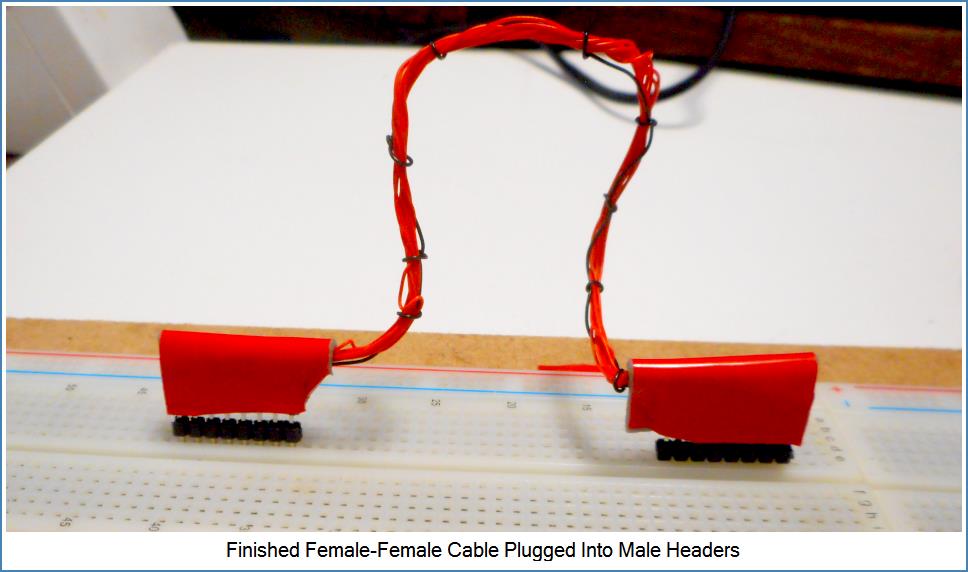
When wiring solderless breadboards, it's common to connect micro-controllers, modules, and breadboard sockets with jumper-wires. But as your project develops, you may be staring at a tangled wiring rat's nest.
Luckily, there is a better option.
By replacing a significant portion of breadboard wiring with custom cables, you enhance reliability and project appearance. Each custom cable used eliminates a portion of the wiring mess. These cables can be tailored to exact lengths and wire counts -- making your project look neat and modular.
The process of creating custom cables involves using through-hole headers, a wire-wrap tool, and solderless breadboards. This method is budget-friendly and relatively straightforward to master. However, it does require some patience and determination, as the wires and connectors are quite small.
An important plus is soldering or reheat damage is avoided. You can make and remake custom cables whenever and wherever you need them. And the ability to remove and reinstall the cable for testing or other purposes is helpful.
Custom Cables from Wire-Wrapped Headers
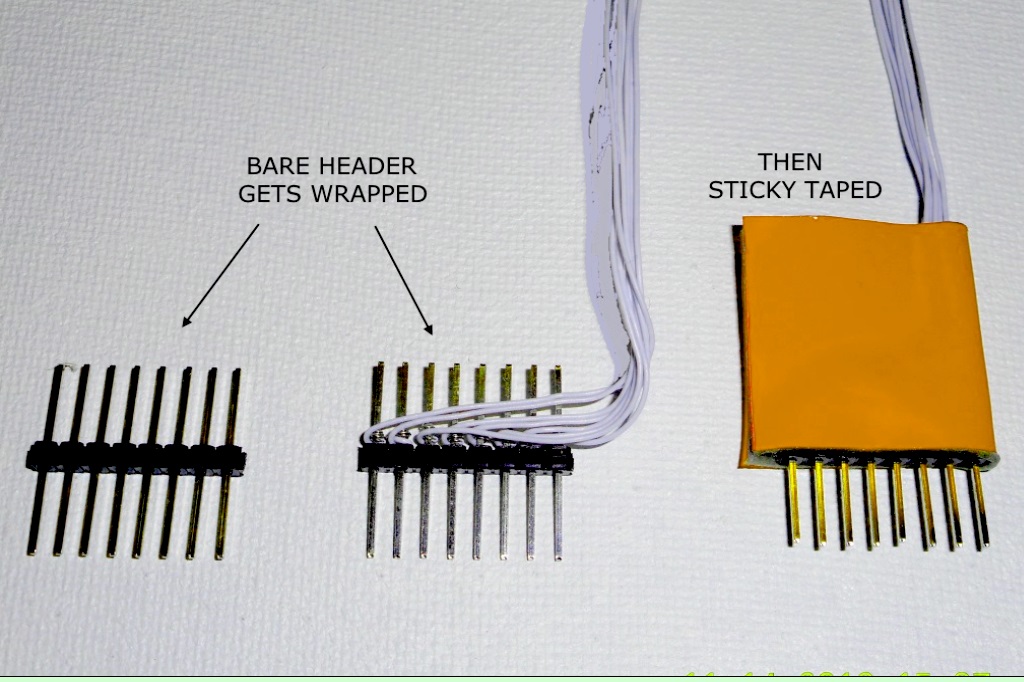
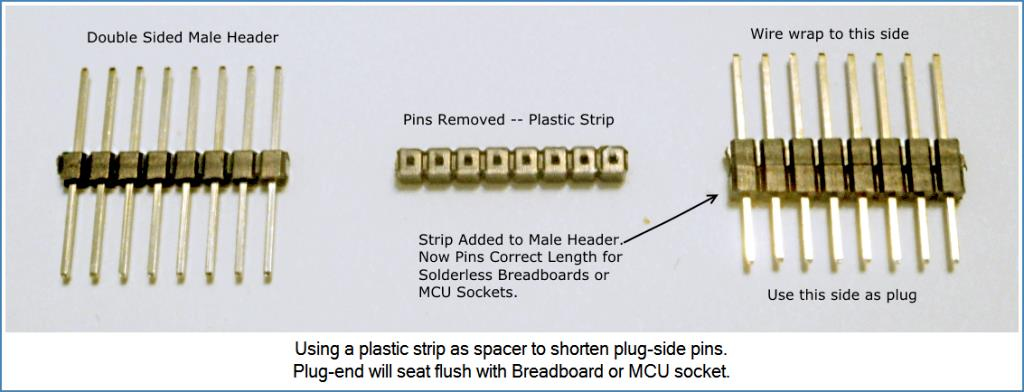
I use wire-wrapped Double-Sided male Headers as Custom Cable plugs. One thing to know about the pins is they're too long to completely insert into MCU-Boards or Solderless Breadboards. The finished plug won't seat flush like a purchased cable. The plug looks and acts somewhat wobbly.
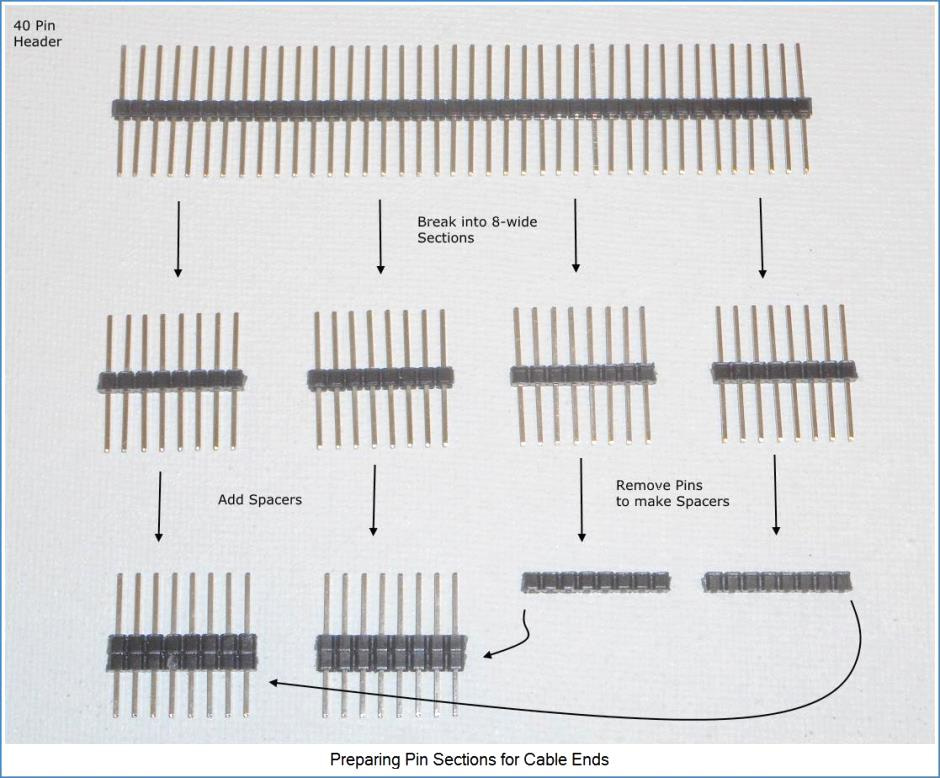
But we fix this by scavenging a plastic strip from another Header -- then sliding it over the plug-side, shortening the pins. Now the plug seats flush. Please see next Image...
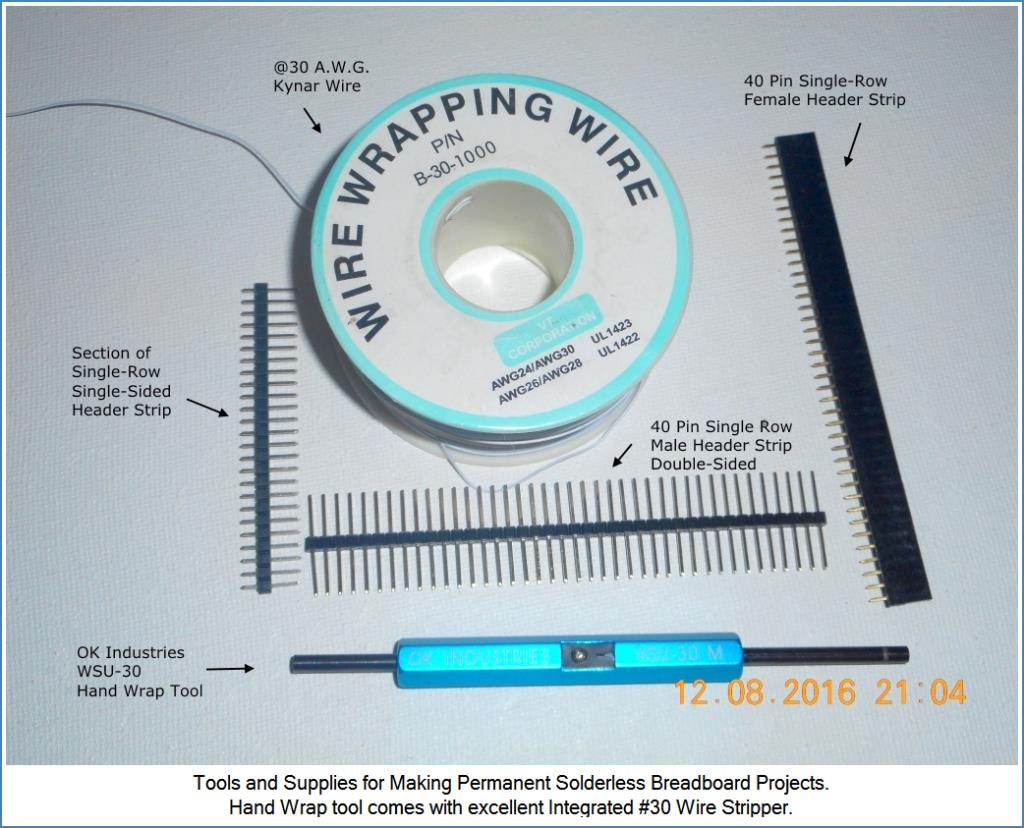
Tools to Make Custom Cables
You'll need a hand-wrap tool and some #30 AWG Kynar wire. You also need Double-Sided male Headers (or female Headers for Cables with female plug-ends). All these items are available online. Shop around and you'll find what is shown in the next Image.
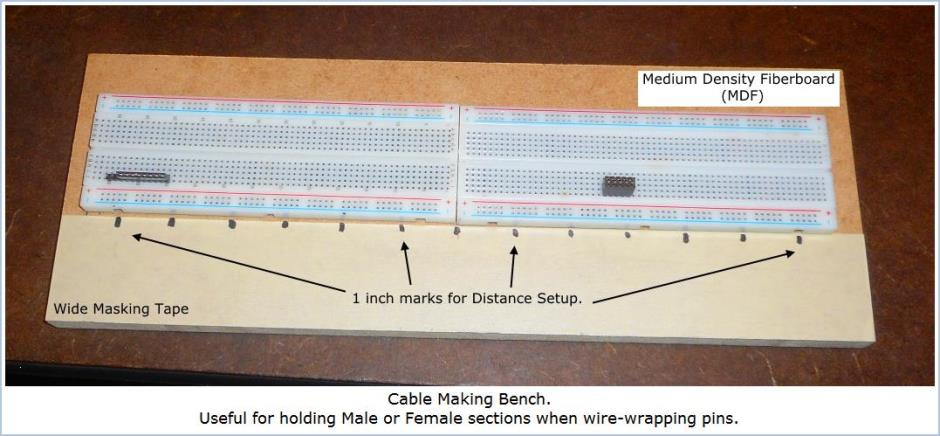
Solderless Breadboard Cable Making Bench
I have poor vision and unsteady hands. I needed something to hold Headers stationary while wrapping wires. I tried third-hand tools with little luck. Eventually, I made a Cable Making Bench from MDF and two breadboards. The Bench also helps you set a known distance between cable-ends.
Custom Cables Male-Example: Step by Step
For starters, obtain some thru-hole, Double-Sided, break-away male header strips. These are usually 40 pins in size and can be found on eBay.
In this example, we'll make an MCU-to-Breadboard cable of 8 pins. Each plug-end will be male. This requires 4 (8-pin) Double-Sided male header pieces, 2 for the cable and 2 scavenged for plastic. TIP: Save any left-over pins for Barrier-Strip duty.
Breaking Headers is easy using long-nose pliers. Count the needed pins and break at the notch just beyond.
Use long-nose pliers to remove pins from two of the Headers. The scavenged plastic-shrouds are slipped over the 'plug' ends (shown in previous image). This creates a Spacer to reduce plug end pin length. Without the Spacer, pins are too long and won't seat well.
Once plug-ends are ready, its time to decide an overall length for the finished Custom Cable. It can be made for just a few inches or perhaps a few feet. For this example I chose a length of around 4.5 inches. Add an extra 1.5 inch to offset taping losses.
Wiring the Cable
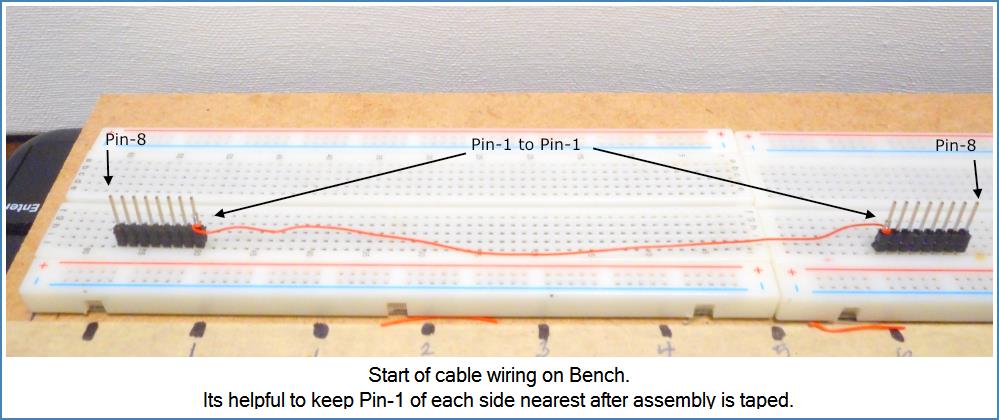
Plan on wiring your cables with pin-1 ends closest to each other on the assembly bench. This technique results in cables whose pin-1 is always closest to the wires exiting each plug end! That arrangement is very helpful when connecting and checking your project.
I suggest stripping 1-inch off each wire end as adequate for good connection. Wrap connections from pin-1 to pin-1, then pin-2 to pin-2 and so on. Do this until all 8 wires are connected to their respective pins.
Test Connections
Once wiring is complete, check connections using a DVM (or a battery and a buzzer would work too). Testing ensures nothing is shorted or miswired. This is fairly easy to accomplish on a Cable Making Bench.
Tie the Cable
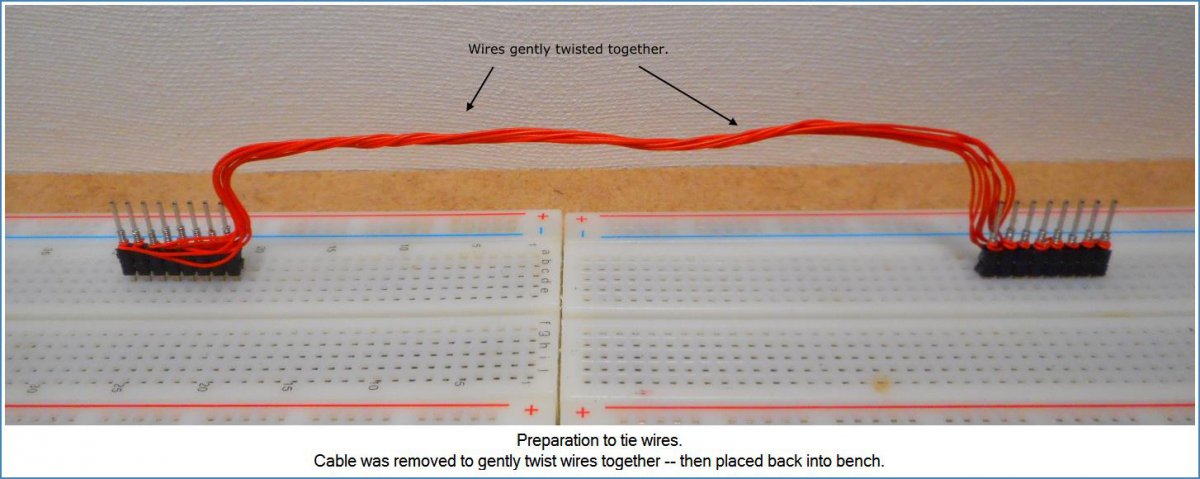
If all connections test OK, I take the cable off bench and gently twist connectors so wires wrap around each other.
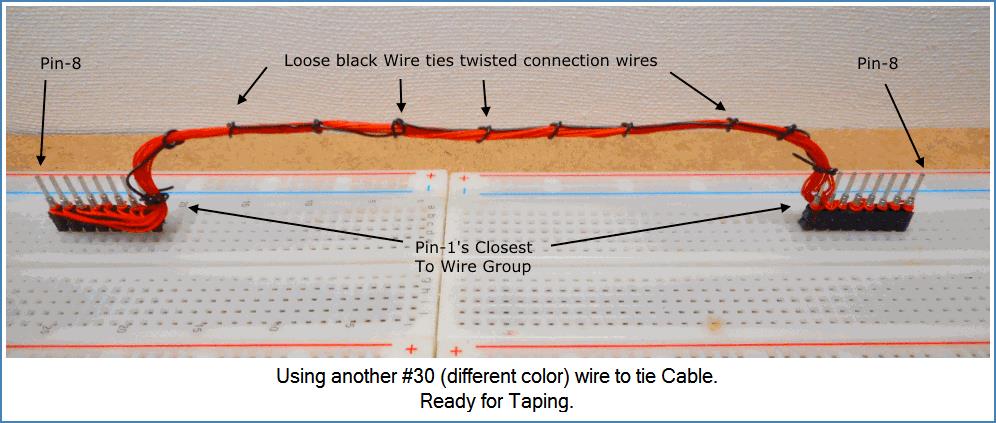
Back on the bench, I add a separate (usually different color) wire to tie the wires. See next picture.
Finishing the Male-Male Assembly
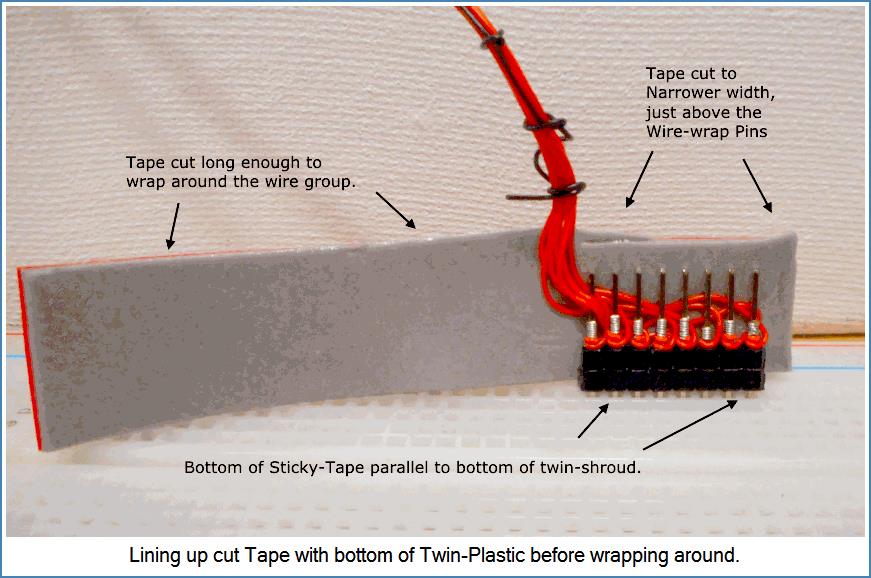
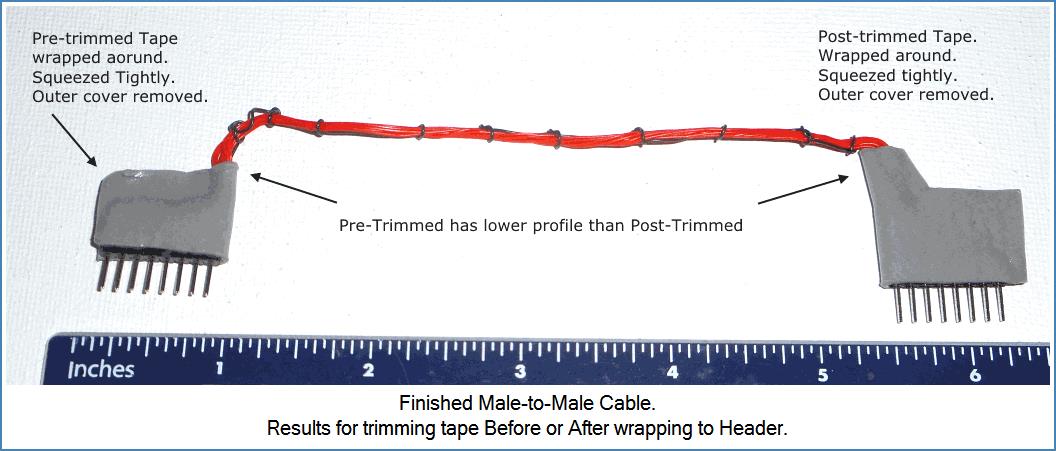
As shown in the next image, a wired header strip is ready to be covered with 2-side sticky tape. I usually cut tape to twice the header length plus a little more. This ensures I can wrap the tape around the wire-side of the pins. NOTE! Its important to ensure your sticky tape covers the plastic shroud strips at bottom.
Wrap tape around the wire group and press against the header firmly. Squeeze and smooth tape ends together. With scissors, cut away any excess. Take off the tape's protective cover if desired.
After doing this to both cable ends, we have a completed assembly. It takes a while to accomplish your first time. Once you've made a few, the process goes fairly quick.
Custom Cables Female Example: Step by Step
Thru-hole Female headers are also suitable for wire-wrap. But because the pin lengths are shorter than 2-Side Header pins, its tricky to accomplish. Its only possible to wrap one connection per pin.
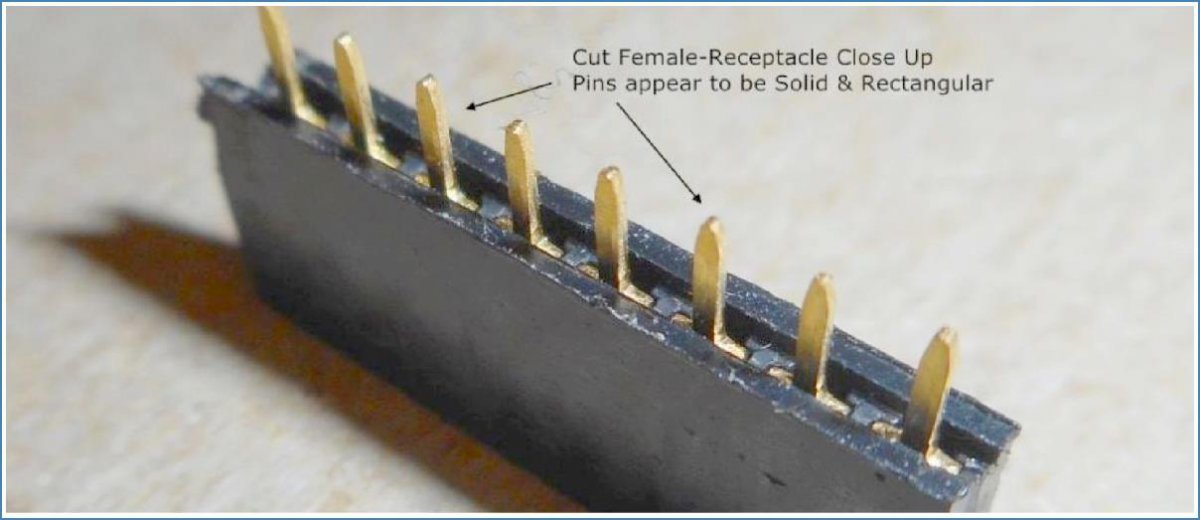
Be prepared to take more time and encounter more setbacks as you make this type cable. If possible, get the header type shown in the next image. The pins are solid metal with rectangular edges. Those rectangular edges help keep connections reliable.
Female Plug Ends -- Prepping for Build
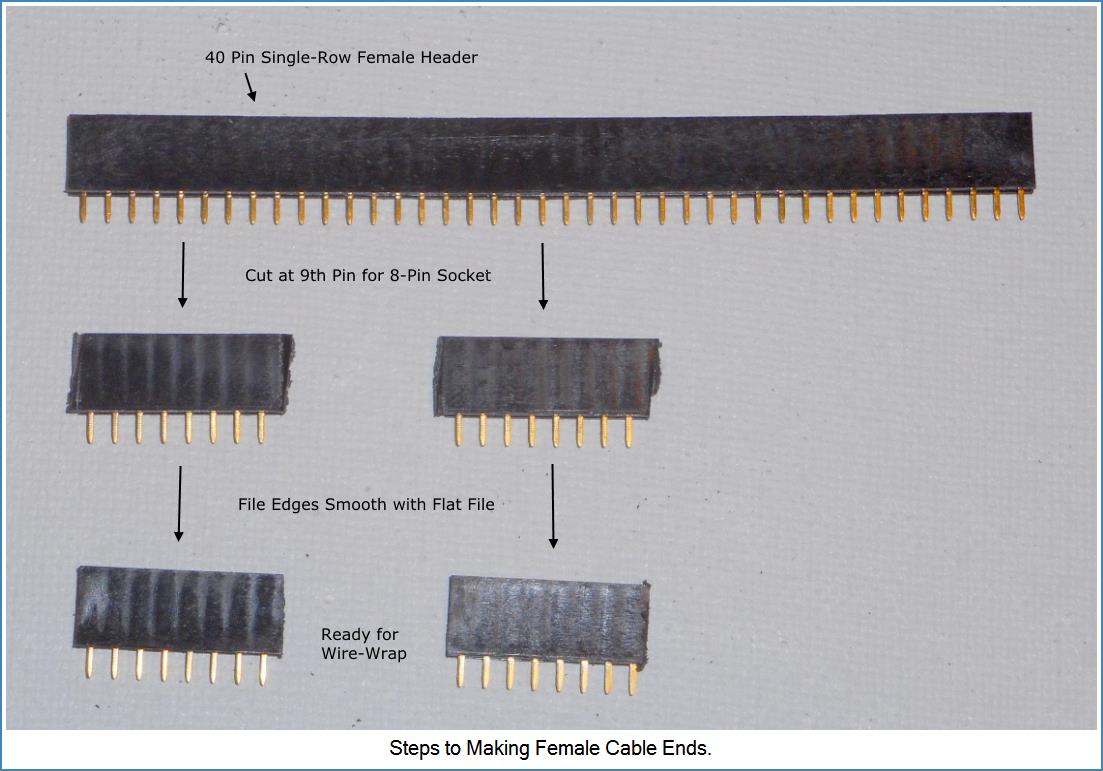
40-pin Female Header strips can be obtained online for low cost. I buy them in lots of 10 or more. Once I decide on a particular cable size (number of wires), I cut the header strip with rugged dyke cutters. I count the number of pins I want plus one. I cut on the plus-one pin, breaking it apart. The metal inside is freed and must be discarded to avoid any accidents! Rough cut edges are filed smooth with a standard flat file. In this example, we'll make two 8-pin female plug-ends. (See next Image).
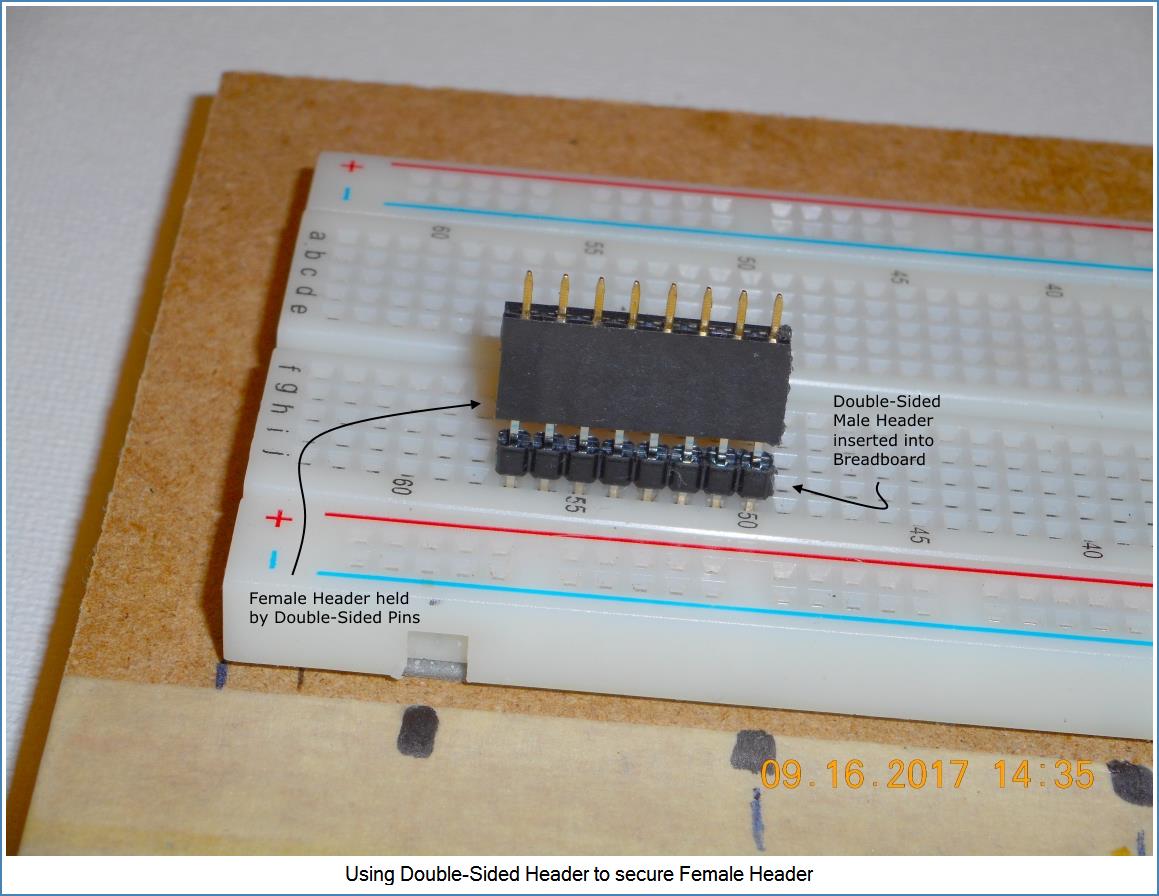
The Cable-Bench is a must for doing this type assembly. Plug male-headers into the bench first, then plug the female headers onto the male pins. This holds the females steady when wrapping wire to short pins. (Please see next image).
Wiring the Female Cable
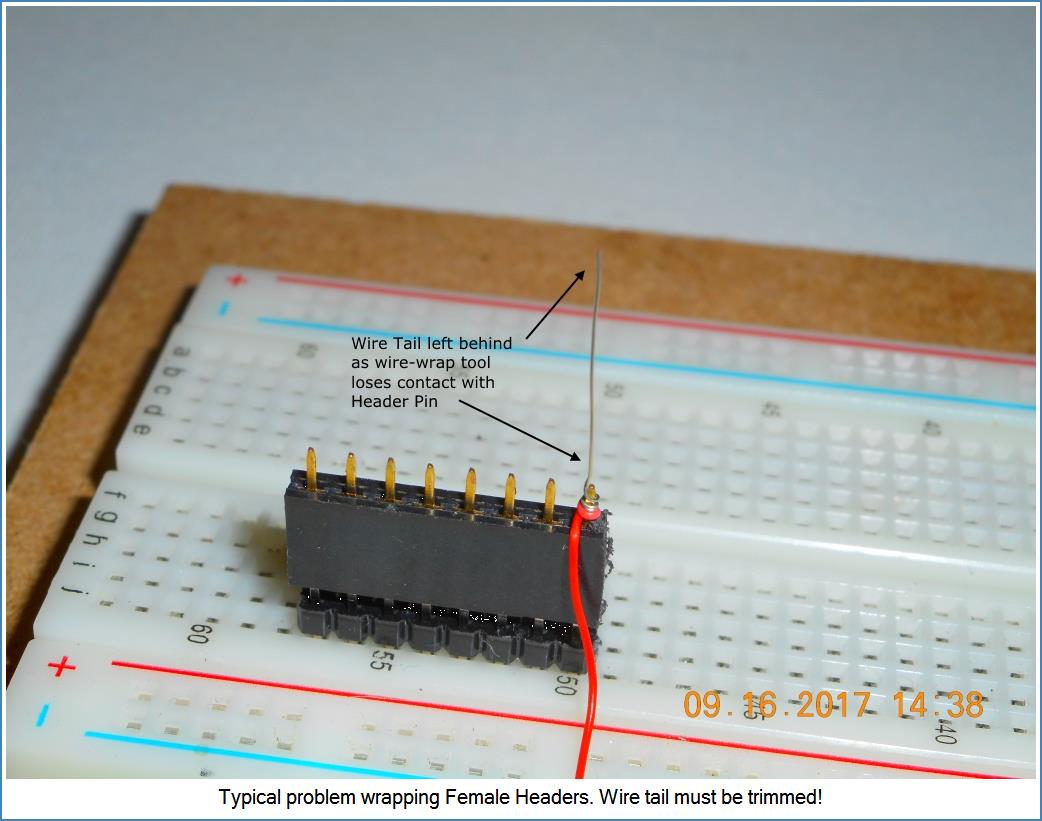
I suggest stripping only 0.5-to-0.7 inch of insulation off each wire end for these connections. Be warned that its very likely you'll encounter problems performing each wrap. The short pins are filled with wire so fast you'll likely be off the header pin after a few turns. This OFTEN results in a bare wire tail sticking up in the air. Go after that tail and use pliers to manually wrap it around the pin if needed. Then cut the tail part away. See the next image.
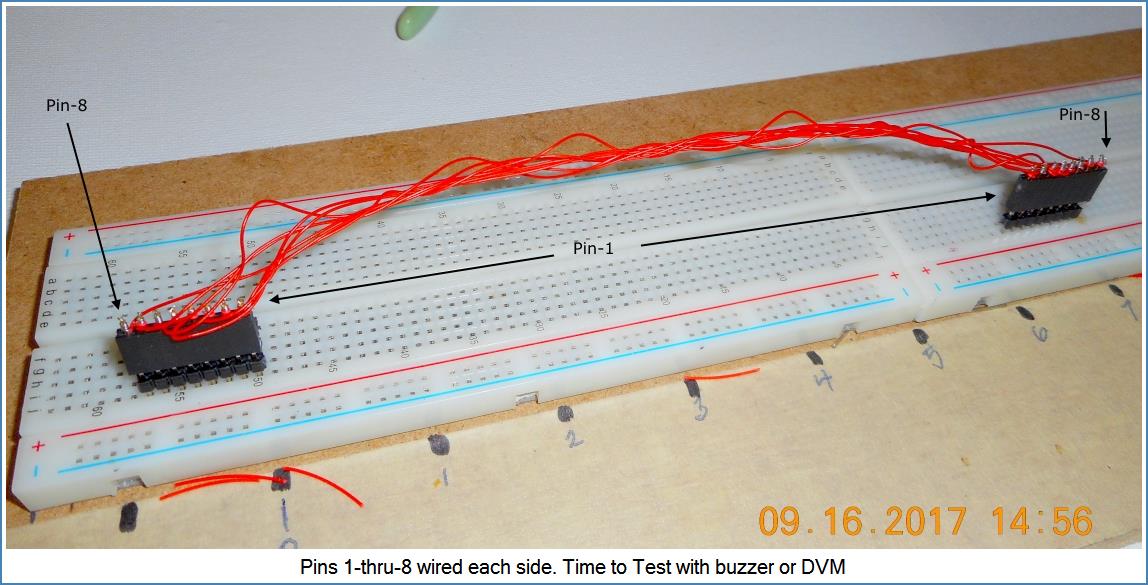
Keeping in mind these tail problems are likely at each pin, proceed slowly and check each pin. Wrap connections from pin-1 to pin-1, pin-2 to pin-2 and so on. Do this until all 8 wires are connected.
Test Female Cable Connections
Once wiring is complete, check connections for continuity and shorts using a DVM. This is made easier on the cable-bench. Upon completion, its time to ties the wires.
Tie the Female Cable Wires
Like the Male Cable shown in previous Images, we need to secure the wires by using an additional #30 wire as a Cable tie.
Tape Female Headers
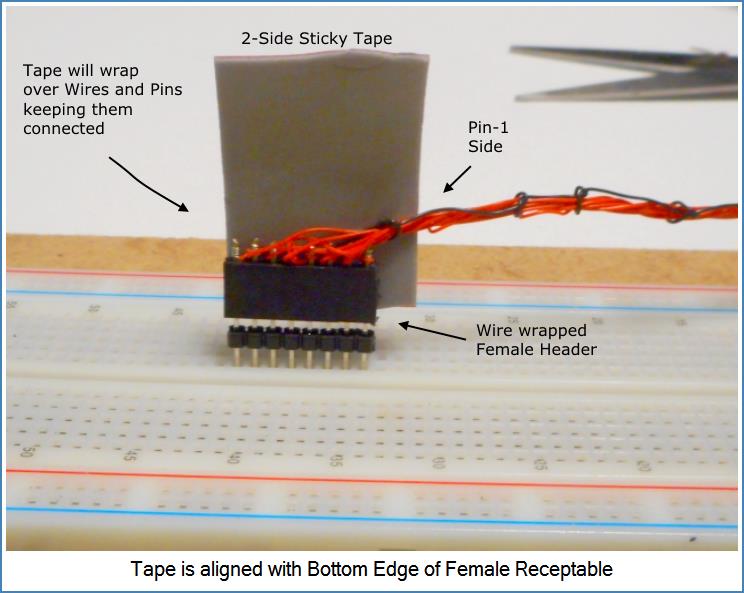
Now its time to cut a suitable length of sticky-foam tape and align it with the female body edge as shown in the next image. The idea is have the tape hold the wrapped wires and pins together. Without this, your cable will pop connections as you move it around. So, don't fail to do this step!
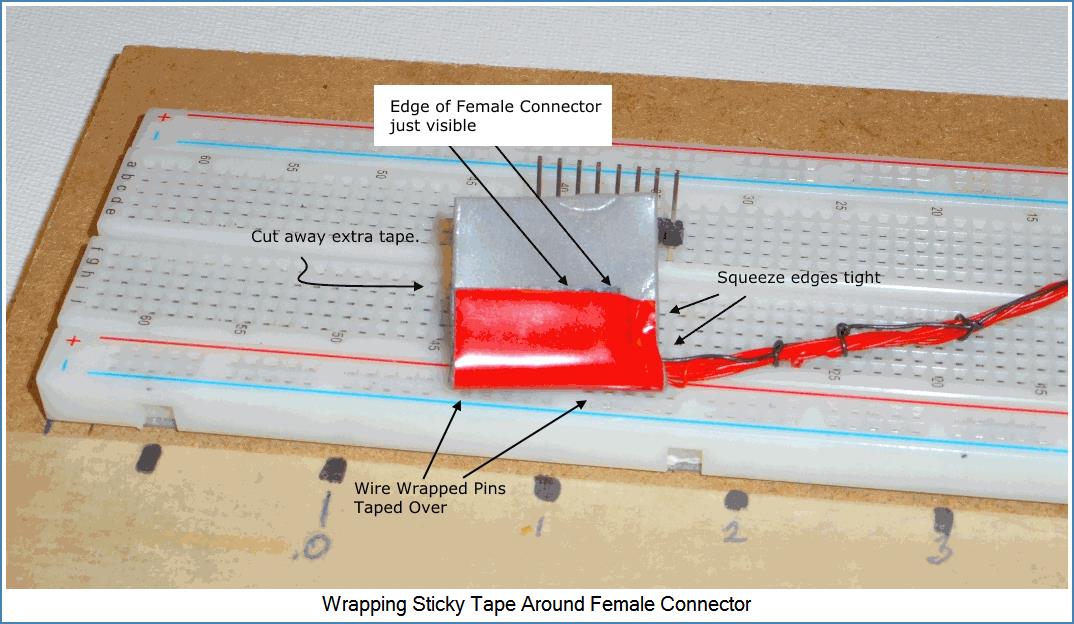
Once the Tape is wrapped around the header body, scissors are used to cut away extra tape. I press the meeting ends of tape together tightly. Your result should be similar to the next image.
Final Result
With both connectors taped, we can make a quick double check by again buzzing connections. The supporting Male headers on the bench do expose a small amount of pin per wire. If that doesn't appeal to you, you can place single-sided headers in parallel to the double-sided ones.
In Summary
We've seen how Custom Cables can be fashioned using thru-hole Headers and Wire-Wrap. The resulting assemblies have been in use here for years with no problems. The benefits of reduced complexity, enhanced-reliability and improved-appearance outweigh the time and costs of making the Cables. As long as you're careful to ensure valid wraps and tape carefully, you should be able to duplicate these results.
