
RTM_TimerCalc is an advanced Arduino Timer Calculator. It comes to you as a free WIndows desktop application. Its mission is to make easier the creation of C++ code for Arduino Timers.
The application targets Nano, Uno and Mega2560 MCU boards. Other boards based on 2560 or 328 CPU's should be compatible with TimerCalc Code. The Code must be copied and pasted into a suitable IDE for compile and upload.
Arduino Timer Calculator Interface
RTM_TimerCalc presents three main User areas;
- Parameters -- selectable presets and several edit areas.
- Report Window -- Calculation results and Limits information.
- Code Window -- the actual C++ code to copy for your IDE.
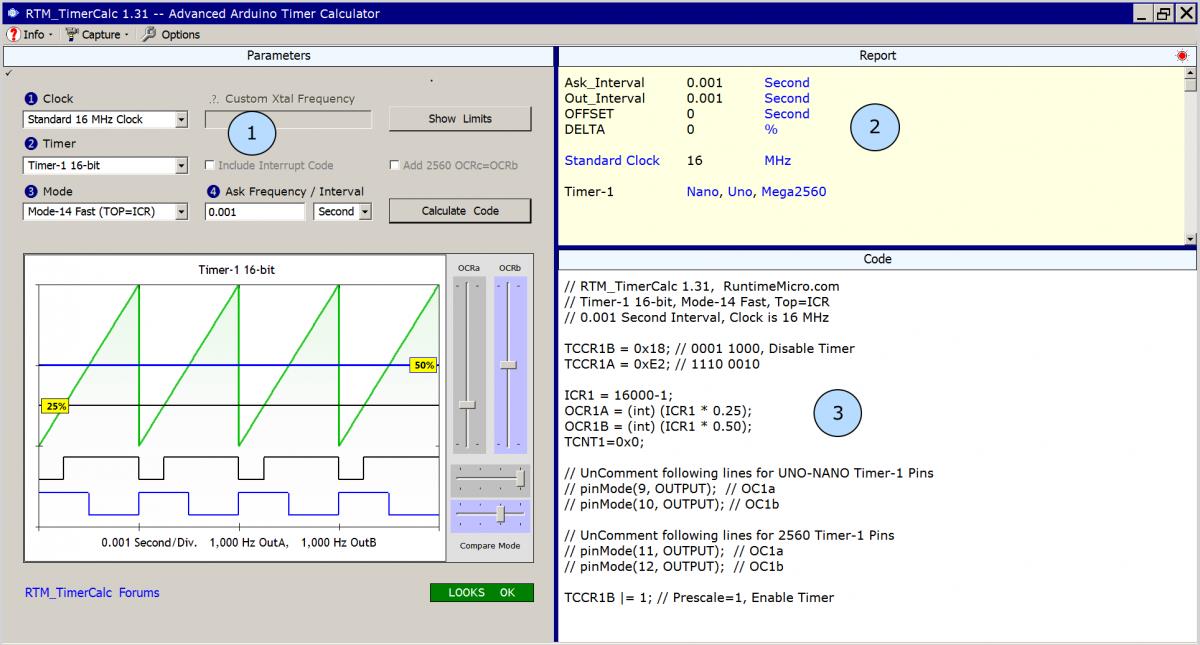
Parameters Area
A blinking prompt guides you to make selections for Clock, Timer and Mode. Selections are limited to Timer Modes that allow adjustable-Frequencies or adjustable-Intervals. Other Timer modes exist but are excluded for simplification. This speeds getting a useful result.
A text edit box allows you to enter the 'Ask' Frequency or Interval. The Units drop-down is selectable for Frequency or various Units of time.

Below these items is the WYSIWYG chart. It contains Slider controls for adjusting Waveform Duty-Cycle and Output-Compare modes.

As you change these controls, the Waveform display will also change. You get immediate feedback on what to expect after generated code is compiled in your IDE. An oscilloscope connected to pins you targeted should display the same waveforms. Thus the claim for WYSIWYG.
Report Window
RTM_TimerCalc has a detailed report of Calculation Results. This view is shown after you click the Calculate button (unless a Limit is hit).
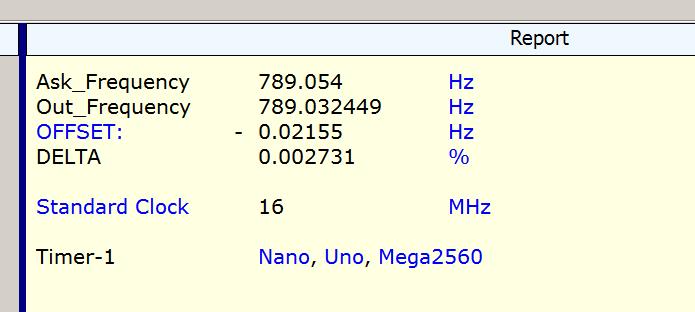
What you 'Asked' for is shown at top and just below is what the hardware can deliver! These values can be the same or far apart dependent on; Timer Bit-size, pre-Scale, N-Divide and Mode. The higher you go in Frequency (or smaller Intervals), the larger the chance of hitting a large OFFSET.
The OFFSET (in frequency or time) is shown below the Ask and Output values. OFFSET is the difference between Ask and Output. Just below is DELTA, which presents OFFSET as a per-cent shift from Ask. A glance at DELTA can reveal problems (like being far from what you wanted -- Frequency or Interval wise). Its up to you to decide how much DELTA-shift is too much.
Also new in RTM_TimerCalc is a detailed report of Frequency and Interval LIMITS.
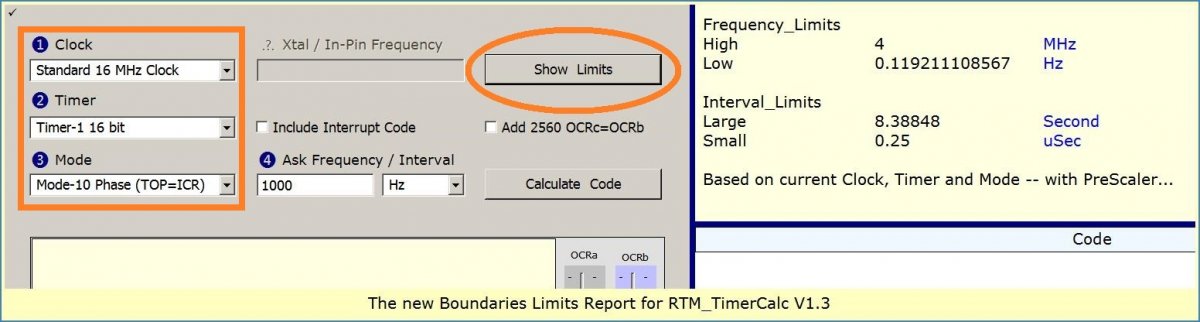
A variation of this report will show when a Limit-Error occurs. You'll be shown the exact problem and supplied with a suggestion to resolve the problem. The Timer hardware has limits it can't exceed. RTM_TimerCalc figures these boundaries and catches inputs that can't work. All Report-Window values are arranged in columns to make viewing easier.
NOTE: You can not Paste or Edit text in this Report Window -- but you can Copy text (or numbers) as you wish.
Code Window
Generated C++ code appears here after clicking Calculate. Some code words may be colored blue that tie in with Report-Window warnings. Pay particular attention to such words,
You must Copy-Paste any wanted Code-text to your IDE for compilation. You may be prevented from performing a Copy if you changed any Parameters after clicking Calculate! A warning pops up in this event and the Calculate button may flash. You must click Calculate again to generate code that reflects your recent changes. In this way, you are stopped from using Code that no longer matches Parameters you recently changed. Don't worry, TimerCalc will guide you thru most issues...
The Code-Window contains a context menu you can use to Highlight and Copy code text. You can not Paste or Edit text in the Code Window.
Arduino Timer Calculator Compatible Boards
RTM_TimerCalc targets three (3) popular Arduino MCU boards; Nano, Uno and Mega2560. Other boards that contain a 2560 or 328 CPU should be compatible with TimerCalc Code.

MCU Timers
Each board MCU has two 8-bit Timers and one or more 16-bit Timers. RTM_TimerCalc targets these Timers as follows;
- Nano -- Timers (1 and 2)
- Uno -- Timers (1 and 2)
- Mega2560 -- Timers (1, 2, 3, 4 and 5)
In all three boards, Timer-2 is an 8-bit with extra Prescale selections. The other Timers are 16-bit with fewer Prescale selections.
NOTE: 8-Bit Timer-0 is never used by RTM_TimerCalc.
Output Channels
The Mega2560 has four 16-bit Timers capable of 3 output waveform channels. In the Nano and Uno, 16-bit Timer-1 has only 2 waveform outputs. In all cases, 8-bit Timer-2 has only 2 possible waveform outputs.
Available Timer Modes
Only a few of the possible Atmel Timer modes are used by RTM_TimerCalc. Each mode was chosen for its wide Frequency or Interval range. This lowers complexity while delivering decent functionality. The Modes break down as follows;
8-Bit Timers
- Mode-5 Phase PWM
- Mode-7 Fast PWM
16-Bit Timers
- Mode-10 Phase PWM
- Mode-12 CTC Phase Shifted Square Waves (restored in version 1.4)
- Mode-14 Fast PWM
Errors and Warnings
As you use the application to solve your Timer design problems, you may encounter certain warning and error messages. They break down as follows;
Error Messages
Boundary Errors are caught and displayed with a suggestion how to correct.
OCb not Enabled for OCc to get copy -- You must enable OCb for the 16-bit Timer -or- uncheck the Copy OCb to OCc checkbox. This is a selection only made for Mega2560 MCU boards.
Warning Messages
Interrupts without a matching ISR can cause Erratic Operation or Crash! Be certain you have an Interrupt Service Routine (ISR) declared in your code! A prototype of the proper ISR is highlighted in Blue text within the Code-Window. Without an ISR, your Timer Interrupt can wreak havoc on your MCU. You will always see this warning when you check Include Interrupt.
Low PWM Resolution. Your /N Value in Code is below 100 -- meaning your PWM Duty-Cycle has steps larger than 1%. If you're using PWM to control a Heater, Motor or something precise, you'll likely need a high PWM resolution. A value of 1% step-size is the bare minimum for matching up with the Duty-Cycle display on the Chart. You will need a lower Waveform Frequency (higher /N) to gain back high Duty-Cycle Resolution
Low Phase Resolution. Your /N Value in Code is below 180 -- meaning your Square-Wave Phase Shift has steps larger than 1 degree. You will need a lower Waveform Frequency (higher /N) to gain back Phase Resolution.
Check Parameters -- No Waveform Outputs or Interrupt Selected! You have -neither- Interrupts or Waveforms being generated by the resulting Code. You can still copy-paste the Code if you have plans to use the Timer in some other way.
Warning...Offset. The Timer output Frequency will be different from the Ask Frequency. The Offset is the size of this difference. Pay close attention to where the decimal point is on Offset! The difference may be a fraction of a Hertz or up to several Megahertz! Consider carefully if the Offset ruins your intended purpose or not.
Arduino Timer Calculator Settings
RTM_TimerCalc V1.3 has added more Settings. Any previous version Settings are mostly a subset. You can open Settings by clicking the Options-Button on the Toolbar. You can also use the key combination CTRL-ALT-S to open Settings with a wide viewing area. See next image...
To hide the Settings Grid, click the Options-Button again (or use the CTRL-ALT-S key combo again).
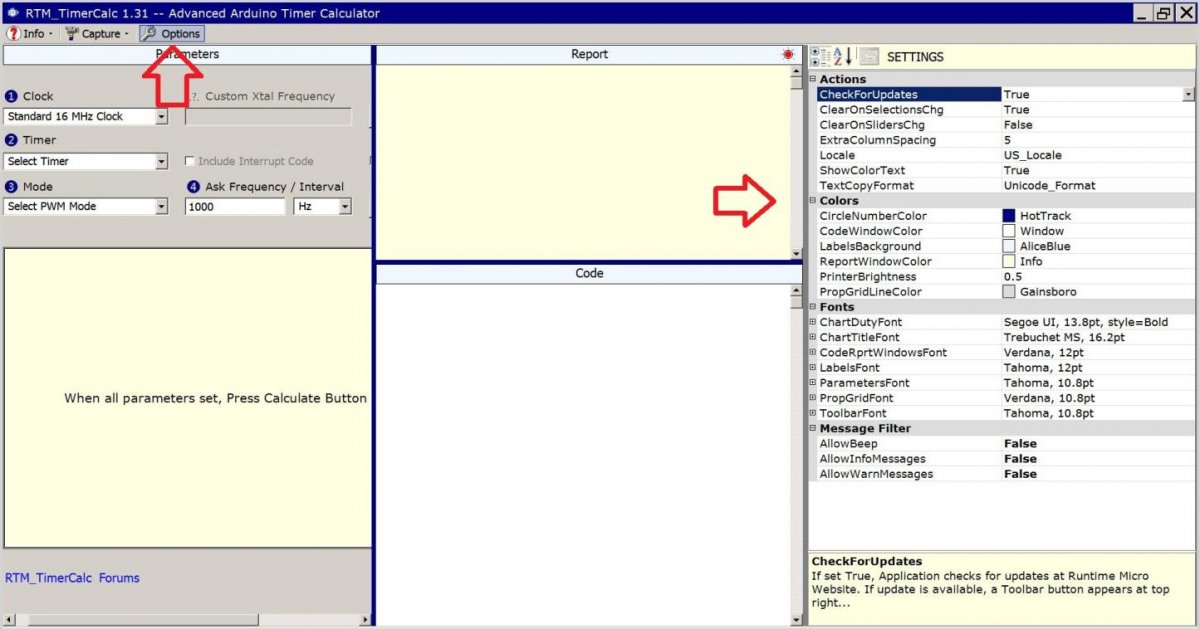
One thing to know. Any given Setting will show in Bold-Text when its value is different from its default-value (as when first installed). This makes it easy for Users to spot changed items. The first version of RTM_TimerCalc showed -all- Settings in Bold.
Even though you changed a Setting, you can make it revert to its default value by selecting the Setting and right-click it to see a menu-item "Reset To Default". Click that menu- item to reset your Setting to its default value.
Actions Group Settings
These Settings let you customize what happens under specific circumstances. They are all new in version 1.20;
Clear On Selections Change: If set True, Report and Code Windows are cleared whenever any non-Chart selection is made.
Clear On Sliders Change: If set True, Report and Code Windows are cleared whenever any Chart-Slider is changed.
Locale: Keep on USA. Included to test difference between France and USA. Eliminates unwanted commas in Code numbers.
Show Color Text: Allows you to show or hide text coloring in the Report and Code Windows. Its a good idea to leave this set to True unless it bothers you.
Text Copy Format: Lets you use one of three text Formats. Its has two plain-text modes and one Rich Text mode. Allows you to match copied text format to nearly any IDE or Editor you may be using. NOTE: If you use Rich-Text-Format, the Arduino-IDE may not recognize Clipboard copied-text as valid! It will seem that Paste isn't functioning. To fix this, use Unicode or ANSI formatted text in Settings selection.
Colors Group Settings
Allows you to customize your viewing experience. May be helpful to adapt to certain Themes or color combinations;
Circle Number Color: The Blinking of numbered Parameter labels is intended to guide you through Timer setup steps. It may not look right in your display. You can change the background color to suit...
Code Window Color: The Background color of the Code Window. Be warned it always uses the fore-color defined by your Windows Theme.
Labels Background: Background color for GUI section Identifiers such as; Parameters, Report, and Code.
Report Window Color: The background color of the Report-Window. Be warned it always uses the fore-color defined by your Windows Theme.
Printer Brightness: Used to save Toner when printing. Has a range from no effect to maximum lightening.
Property Grid Line Color: The Settings Grid has thin lines delineating the different items shown. You can change the color of these lines to suit your needs.
Fonts Group Settings
Chart Duty Font: This new setting lets you control the Duty-Cycle readout in the WYSIWYG Chart. Basically, you can make it bigger and easier to see.
Chart Title Font: This new Setting gives you control over the Title and X-axis text areas of the Chart for easier viewing.
Code and Report Windows Font: Change how your Code and Report text appears.
Labels Font: The font used for app. major area labels (Parameters, Report and Code).
Parameters Font: lets you customize text ion that area but be careful to not choose too large a setting. You can break the display. Remember you can revert ta the default setting using a right-click menu.
Property Grid Font: This new setting lets you use a larger or smaller font for the Settings Grid.
Toolbar Font: Change the size and style of Toolbar Text. This affects the size and style of drop-down menu items too!
Message Filter
Allow Beep: Set False to eliminate Beep sounds on errors.
Allow Info Messages: Set False to suppress Info-Messages in Report Window. (Messages still in tooltip of Code Status-Box)
Allow Warn Messages: Set False to suppress Warn-Messages in Report Window. (Messages still in tooltip of Code Status-Box)
Other Features
RTM_TimerCalc V1.20 adds features that can be helpful, especially to those new to Timer coding and Interrupt use.
Code Status Box
Shown just below the WYSIWYG Chart is a small text area that indicates Code Status. The Status indications break down as follows;
Gray Background, NOT READY: Indicates you cannot Copy code (if its visible). You need to at least click the Calculate Button. You may need to adjust or select Parameter items.
Red Background, ERROR: Indicates something is very wrong. You must evaluate your Parameters, make changes and try again
Yellow Background, WARNING: You can Copy-Paste code but you must decide if you can safely ignore the warnings in the Report-Window.
Green Background, LOOKS OK: You can Copy-Paste code. The app. detects no problems. There is no guarantee that is the case, though!
Stale Code Copy Prevention
If you attempt to Copy code when the Status-Box indicates Gray or Red, you'll be stopped and told to click the Calculate Button. The button may flash repeatedly. This feature stops you from using code that no longer reflects changes you made. NOTE: even if you set your Actions-Settings to not clear the Code Window after changes are made, this facility still prevents you from using Stale code. This can save you time wondering why compiled code doesn't execute as expected.
Printing and Snapshots
Previous versions of RTM_TimerCalc let you take snapshots of the Chart or the entire Application. The snapshot is placed on your Window's O/S Clipboard. Paste it into an email or other Editor. It can be a handy method to generate documentation for a project.
However, from Version V1.3 and beyond, TimerCalc adds Printer capability. You'll find this ability on the upper toolbar Item now labeled "Capture" (see next Image).
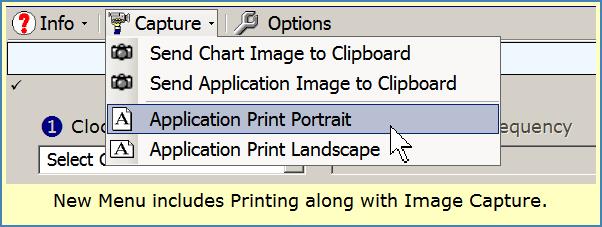
Separate menu items allow for Landscape and Portrait printouts. The printed image is sized on paper such that there is still room to add written notes if pasting into a lab notebook.
NOTE: There is no print-preview unless supplied by your Printer software.
NOTE: You can control the 'brightness' (toner amount) of printing in the Options / Settings section of TimerCalc.